
- Sitting
- Voice Settings
- Looking : adjusting your viewers camera and moving it around
- How to "Buy or Collect" Objects
- How to Unpack them
- Other Inventory Skills

Does everyone REALLY need to know what's on the TV at your house, or hear you holler at the dog?
Consider carefully before wandering around with your microphone open. Computer mics pick up an amazing amount of household noises. Think if you really want someone you don't know in Belgium to listening to your house noises and your breathing before wandering around with an open microphone. Would you want to hear theirs?
CLICK ON ANY OF THE IMAGES ON THIS PAGE TO ENLARGE THEM AND SEE THE DETAILS BETTER.
HOW TO COMMUNICATE:
There are two basic types of non-voice communication: LOCAL CHAT and Instant Messaging (IM)
LOCAL CHAT means everyone within a certain distance from your location can see what you say, so
 reserve things appropriate for the general public to Local Chat. It is also considered polite to engage in conversation about a live performance in typed Local Chat - something which would be considered rude in a real world live performance. It is considered impolite to engage in conversations that are not in some way related to or inspired by the performance.
Local Chat can be found on the bottom control bar of your Viewer. (Click on the image to the right to enlarge it, and look closely at the white bar on the bottom).Type your message in the white bar and hit return.
If you don't have a white bar, there should be a "Chat" or similar button on the lower bar that will make that white bar appear.
IMs work very much the way they do in facebook or other places. It is meant for private communication, such as asking for assistance or a teleport to a location.
There are two ways to start an IM conversation. One is to right click on the individual's avatar and choose "IM" . . . a communication window will open and you can type your greeting, request, message, etc.

If the person is on your "Friends" list, all you need to do is select their name on your Friends List and click on the "IM" button to begin a conversation in the communications window that will open. NOTE: It is also possible to have a private voice conversation from this same communications window. Use the the button with the telephone Icon to initiate such a call. It is polite to type the request "may I call you?" before trying to initiate a private voice call.
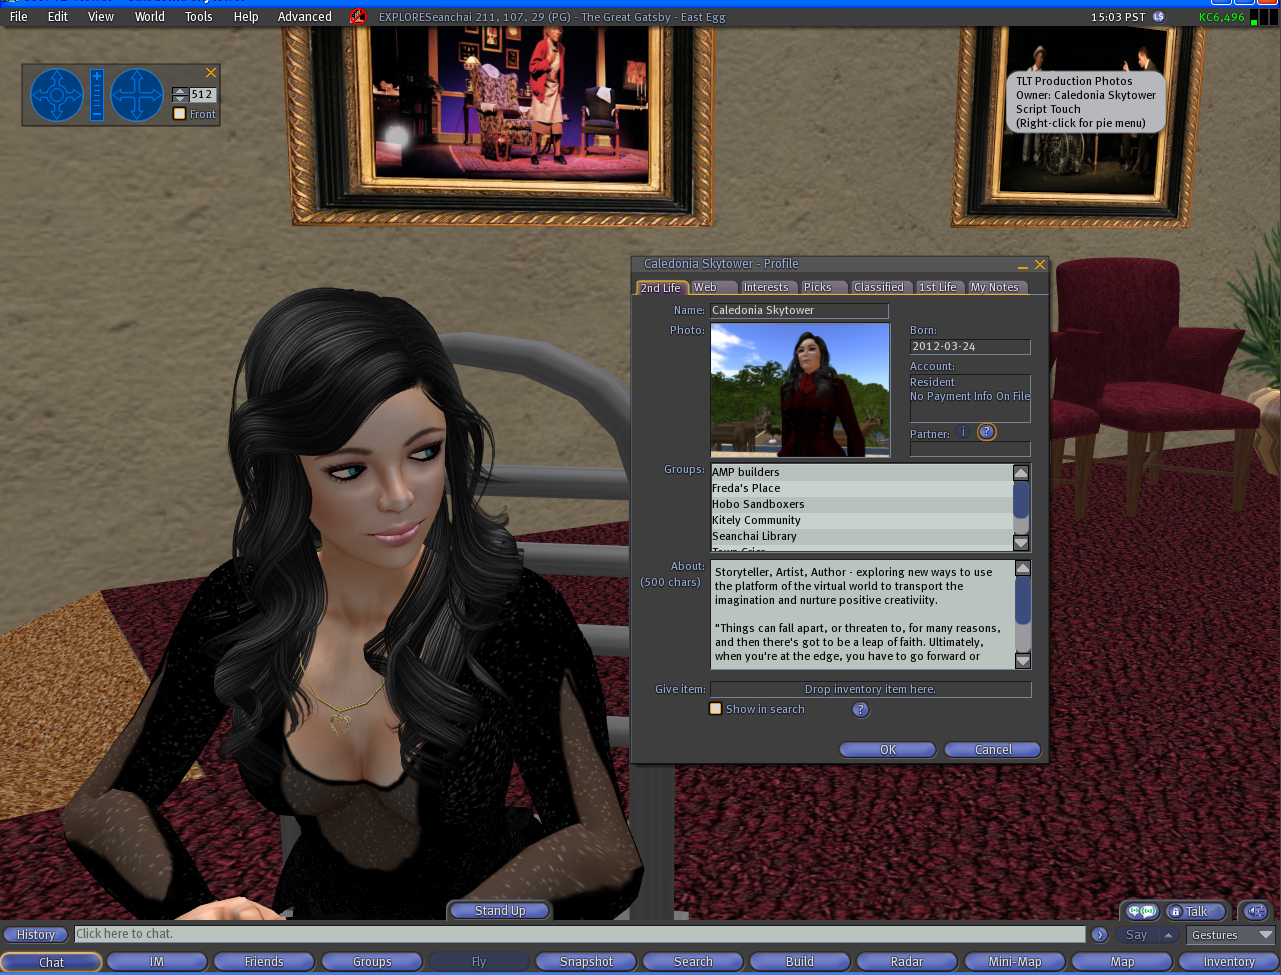
Yet another rule of virtual etiquette: it is considered rude to blindly offer people friendship without asking first.
In general - while it seems a wild, barrier-free virtual world - good manners are still appreciated and politeness is in the best of taste.
***
CLOTHING AND APPEARANCE:
Free Avatar kits and clothing can be found in The Wardrobe room at the EXPLORE Welcome Center. There are instructions there on how to adjust your APPEARANCE, and how to change CLOTHING and HAIR.
APPEARANCE

Your basic appearance is made up of two fundamental elements: Shape and Skin. Shape and some minor Skin elements can be adjusted in the appearance Menu. Right click on yourself, and you will assume a static pose and this menu will open on your screen. Note: find a nice private place to do this, like the Wardrobe in the Welcome Center. It's a little disconcerting if done in public unless you are trying to solve a rezzing issue (like you are a puffy cloud, or your skin and clothing is not coming into focus).

Your skin can also be changed as you collect or purchase new ones. They are "worn" in the same way that Clothing Layers are (see "CLOTHING AND HAIR). Here is what Shape and Skin items look like in your Inventory:

CLOTHING AND HAIR
Your appearance can be further customized with items which you attach to the basic avatar shape, or "wear" as we call it.
There Are:

- Clothing Layers: which applies itself in layers to your Shape from the Skin up - tattoo being the closest to the kin, and jacket being the farthest. These layers stack on top of one another and are represented by specific icons in your inventory. They include: tattoo, undershirt, underpants, short, pants, skirt, and Jacket.

- Wearable Objects: that appear as a little box. These are sculptural items that enhance the dimensional of your outfit: skirts, shoes, ties, collars, cuffs, hats, etc. These items must be "Attached" or "ADD"ed and "Detached."


- Alpha Layers: are required for some wearable object, and all mesh clothing. The Alpha renders your shape invisible so it can be replaced with the wearable object or mesh item which you attach to yourself (wear). It is usually denoted by a shirt icon with little crossed lines in it in your inventory and SHOULD have "alpha" somewhere in the name.
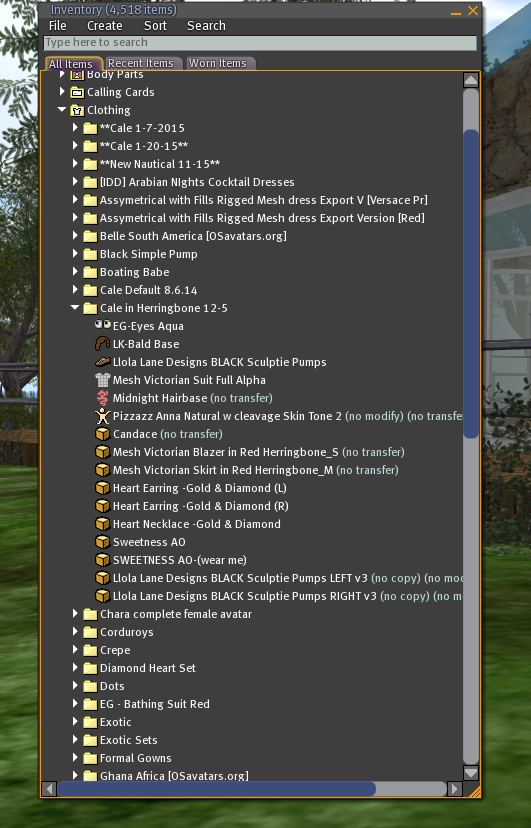
- Mesh Objects: A specific type of object which is sculptural, flexible and, as stated above, requires an Alpha Layer as it replaces part of your basic avatar Shape. Mesh objects will appear as a box in your Inventory, just like traditional Wearable Objects.
Hair . . .
Like clothing, hair is something you apply to your basic avatar. It also comes as a traditional wearable or mesh type object.
Traditional object hair requires a Bald Base attached to the skull in order to appear correctly. That icon appears as a little brown wig-looking item. "Wear" the Bald Base and "Attach" the hair.
Mesh hair works similarly, but may include a Tattoo Layer to be worn - instead of the Bald Base - to allow the hair to look correct. If you haven't figured it out yet, the Tattoo Layer looks like pink toothpaste, fresh squeezed out of the tube in a little squiggle. Again, "Wear" the Tattoo Layer and "Attach" the hair.


NOTE: Clothing Layers are removed by the "Take Off" command and Wearable Objects are removed by the "Detach" command. The easiest way to do that is to open the "Worn Items" tab in your open Inventory. They can also be changed by choosing "Wear" or "Attach" of another such item in your Inventory, and it will replace the previous item. Wearable Objects can also be right clicked on when they are being worn and "Detach" chosen from the pie menu which appears.Like clothing, hair is something you apply to your basic avatar. It also comes as a traditional wearable or mesh type object.
Traditional object hair requires a Bald Base attached to the skull in order to appear correctly. That icon appears as a little brown wig-looking item. "Wear" the Bald Base and "Attach" the hair.
Mesh hair works similarly, but may include a Tattoo Layer to be worn - instead of the Bald Base - to allow the hair to look correct. If you haven't figured it out yet, the Tattoo Layer looks like pink toothpaste, fresh squeezed out of the tube in a little squiggle. Again, "Wear" the Tattoo Layer and "Attach" the hair.
No comments:
Post a Comment